How to Use Instagram Multiple Posts (And Why You Should)
Want to share a series of photos on Instagram?
Or maybe you want to combine both videos and images into one post?
Doing so is now possible.
You can now upload up to 10 photos and videos and share them as a single post in your feed, presenting them in a carousel-styled post where users swipe it to see the next post.
In this article, you’ll learn exactly how to upload multiple images, and why it can be useful.
How to create a post with multiple photos or videos
If you want the quick-guide by Instagram, you can look at the Image below. Otherwise, scroll past it and get a more thorough guide of how you manage multiple posts.
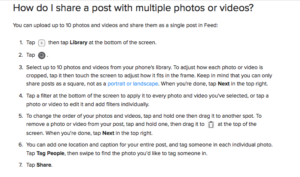
To choose photos or videos to combine, tap on the + sign just like you do when sharing a regular post in Instagram.

On the screen, you’ll now see an icon with three stacked squares that is the icon for multiple posts.

Once you’ve tapped the icon, you can scroll through your album and select up to 10 photos and videos. The order of the images/videos is displayed in each corner of the chosen post in the form of its number. This is the order the posts will be displayed in the slide show when you share the multiple posts.

If you want to change the order of the posts, you can do so by simply un-marking them by tapping in the top-right corner. Then, select them again but in the new order.
You can also unmark a post if you want to remove it from your slideshow completely.
When you’ve selected up to 10 images, tap Next in the top right corner. This will take you to the place where you can edit the photos and videos. In the first screen, the filter you choose will be applied to all of your photos/videos.
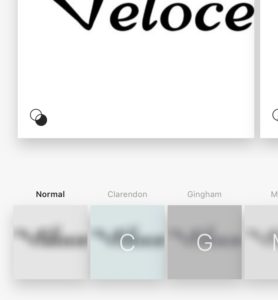
If you wish to edit a photo individually you can do so. Simply tap on the image you wish to edit and then edit. When you are done editing, tap Done.
If you wish to change the order of the posts, you can also do that in this interface. Tap and hold on the post you wish to move and then slide it into the right placement. You can also remove the post completely by tapping and holding it, then sliding it up into the trash can.
The next screen will take you to your regular caption section. When writing a caption for multiple posts, you can only create one caption. if you tap on the photo, a new menu will appear that lets you tag users individually in each post. This is particularly helpful if you have a bunch of group shots with different people in each of your slideshow.
Now, tap Share!
Why and how you should use Instagram’s multiple posts
Instagram multiple posts is a fun and engaging way to give your posts more context – or just a place to be extremely creative.
When a carousel post is displayed in your feed, you’ll see the first photo or video that the publisher has chosen. At the bottom of the photo/video, you’ll see a row of dots. This lets people know that it’s a carousel post. When you are seeing a carousel post on your desktop, you’ll also have an arrow pointing to the right on the post that you can click to slide to the next image.

A multiple-imaged post will be displayed with the stacked squares symbol in the top right if you are seeing it on someone’s feed.
Share a full-size image/panorama
A very creative way to use Instagram’s multiple image feature is to split an image into smaller pieces so as you slide, you’ll see the full image.
By adding multiple images from a panorama, you create an amazing effect, and because people want to see the whole image, they’ll continue swiping, thus increasing the time they look at your post. And as you know, Instagram’s algorithm also looks at the time of which you look at a post. The longer you stay at it, the more relevant the algorithm believe the post is for you.
To share a panoramic image, you need to split it into smaller pieces before you share it on Instagram.
Here’s an example of how GoPro have split an image into three posts, creating a very interesting effect.
How to create a panoramic image
In order to share a panoramic post, you first need to split it into smaller pieces. Import the photo to Photoshop, then select the crop tool and set your ratio to 3 x 1.

When you do this, the images you choose will automatically be the correct size for a slideshow, now awkwardly cropping your image.
Crop the image into three pieces, then export. Now, select the images and post them on Instagram in the right order!
Showcase your products
Slideshows are great for product showcasing because that allows you to share the benefits and features of a single product, or share different variants of it, such as colors.
Step-by-step guides and tutorials
This is one of the most popular ways Instagram’s slideshow has come to use (apart from people sharing random pictures).
The slideshow lets users go through each step in a simple and easy-digestible way by sliding to the next step once they’re done.
If you’d like, you can share short videos of how people can do whatever you are teaching them in a simple way.
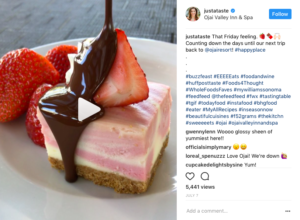
@KellySenyei gives her followers a recipe that she then go through in an interesting and easy-to-follow way with amazing images on the way. She begins her slideshow with the end product so her followers know what they are in for (and are excited to do it themselves).
She also includes video to help make the following process more digestible.
Share user-generated content
Now, you’ve probably heard about the importance of sharing user-generated content because it gets your audience engaged and it encourages them to share more of it, thus giving you more content to use, and more brand/product exposure.
If only there was a way to share several user-generated posts…
Well, there is!
You can often see brands sharing user generated content such as “Pic of the day” but not too many brands are implementing the power of the slideshow!

In case you didn’t know, your customers love being featured by you on your page. It means that you acknowledge them, and appreciate them for sharing a post. As a result, chances are, they’ll continue to do so.
By only sharing a single Instagram post with a user-generated post, you make one person happy. With Instagram’s carousel, you can make 10 customers happy! That’s 10 times the power of a regular post!
The great thing here is that you can tag the photographer in their post, meaning you tag one person in each of the posts you share, giving them the proper credit for the photo, while also making them receive a notification about the tag.
Share the progress of something
People love to see how something was created, and using slideshow is a great way to doing so.
People are always eager to see the end result, so inevitably, they’ll keep swiping!
Give context
A picture says more than a thousand words, so how about 5, or even 10?
If you’ve been to an event or a party etc., chances are, you won’t be able to share all of the event’s highlights in just one image. Therefore, it might be necessary to share more than one image to give more context to what happened, what people did and so on.
Let’s say you share images from a birthday party. First, you want to share pictures of the people who attended, then, you want to share a picture of the cake, then, you might want to include a video in your slide when the candles are blown out.

If you are to only share a single image from the event, it’s difficult for people to imagine what really happened there. With slideshows, you can give a full view of what is happening, and make people feel like they were there.
Creating content that engages your audience is key.
Think about this when sharing a slideshow:
Share the end result in an image the first thing you do
If you are doing a tutorial or anything else that require your audience’s attention, make sure that the first photo of your slide is the end product so people know what they are in for.
Make the first photo appealing
The first photo you choose in your slideshow is the image that people will see when scrolling through their feed. Therefore, the image you choose as number one is extremely important, because it can decide whether or not people will continue swiping or just scroll past it.
Put most emphasis on the first photo and make it appealing. If you’re creating a guide or tutorial, why not even write something on the first image like “Want to create this in 5 minutes?”. Preferably, the first image should be interesting enough to be shared on its own. Apart from being visually appealing, you also want to make the first photo let people know what they should expect when swiping.
Mix photos and videos
Images are great, but they can’t beat the storytelling of a video. Videos and photos is a fun mix that makes your slideshow more double-sided so that every time your audience slide on your post, they are eager to slide to the next one.
Include a call to action to swipe left
If people are scrolling fast through their feed, they might not be able to catch that the post you’ve shared is a carousel.
Make it clear that the posts you’ve shared is a carousel, and encourage people to slide left on it in your caption.
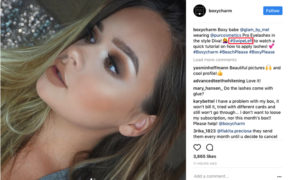
Apart from the first image of your slide, your caption is a great place to let your audience know what they are in for when sliding your carousel. Since Instagram introduced the multiple-posts feature, people have started using the hashtag #Swipeleft to let their followers know what to do. At the moment, the hashtag boasts 344,504 posts.
Good to know:
When people see your post in their feed (or in your profile), they can like and comment on it just like a regular post. With carousels, people cannot comment on individual posts in the carousel, rather on the whole series.
When you’ve shared a carousel, you can edit the caption and location of your post. While you cannot reorder the order of the posts, edit, or delete individual photos or videos, you can delete the post completely.
You cannot change or remove or change the people you have tagged in your post either.
What about you?
Have you used Instagram multiple-posts feature?
How have you used it?
Have you shared panoramic images, or shared both images and videos?
Let us know in the comment section below!


