
The Ultimate Guide to Using Instagram Insights
Every social media platform wants to keep its users on the platform, and they certainly don’t want their users to connect their accounts to some shady third-party app in order to do different things that cannot be done with the app itself.
Instagram is a great example of that, and Facebook too, but today’ they’re both owned by the same company.
For instance, when it comes to keeping its users on the platform, Facebook is like a police that does everything to prevent that from happening. In fact, when you share outbound links in a Facebook post, the reach is decreased simply because they don’t want their users to leave the platform.
We’ve also seen this happening with Instagram. Back in the days, a lot of people were using various third-party apps to crop and make collages for Instagram. However, this meant that Instagram’s users had to leave the platform for another app, so they implemented “Layout from Instagram” – a collage app that helped users make their collages – but inside the app.
The same story goes about Instagram algorithms, also known as Insights. People connecting their Instagram accounts with third-party apps were a huge thing before Insights, simply because there was no way in measuring different metrics inside the Instagram app. For example, if you had over 10K followers, you couldn’t see the exact number of followers you had, and therefore, people turned to third-party apps.
Then came Insights. Insights let Instagram’s users do all of that, and much more inside of the app. And today, we’ll present you with The Ultimate Guide to Using Instagram Insights.
The Ultimate Guide to Using Instagram Insights
Because this is a thorough guide on how you use Instagram Insights, we’ll not go too much into the basics, but we will, however, tell you how to get it if you don’t have it yet.
Getting Instagram Insights is really simple. All you need to do is set your Instagram account to “Business account” and then you’ll get access to the analytics automatically.
First of all, make sure that your app is updated to the latest version. After that, open up the app and tap on your profile photo at the bottom right.
Tap the settings wheel icon at the top right of the page.
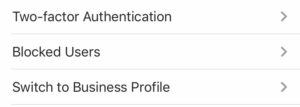
Tap “Switch to Business Profile“.
Here, you´ll be able to see what you can use your business profile for, and you’ll be presented a small introduction of what Insights offers you.
Tap the blue button to activate your business account business account. Then, connect to your Facebook business page to complete. If you do not have a Facebook business page, you need to create on first.
The Ultimate Guide to Using Instagram Insights
There are to places where you can see statistics. First of all, you can view them via your profile in the top right corner, and you can also access them on individual posts.
The statistics you access in your profile are the rich and general stats that gives you information about everything from where your followers are from the which posts performed best and how many followers you’ve gained this week.
When looking at Insights on individual posts, you’ll only see statistics relevant to that particular post and nothing else.
Let’s take a look at the Instagram profile Analytics first:
As mentioned, you access your Insights by tapping the symbol in the top right corner when you are at your profile page.
The first thing you will be presented with is a slide with 5 statistics that you can slide through.
9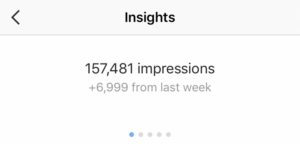
The first statistic is “Impressions”. This is the total number of times all of your posts have been seen over the last week.
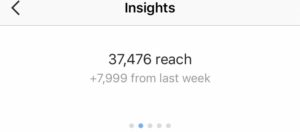
The second statistic is “Reach” which is the number of unique accounts that have seen any of your posts over the last week.
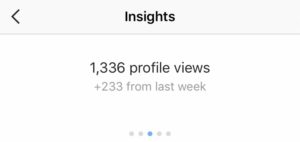
The third statistic is “Profile views” which is the number of times your profile was visited over the last week.
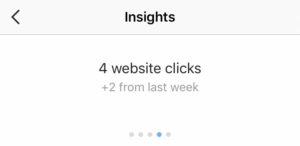
The fourth statistic is “Website clicks” which is the number of taps on the website in your profile over the last week. This will only be visible if you have implemented a website link in your bio.
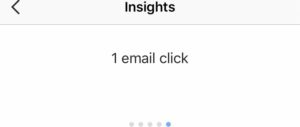
The last statistic is the number of taps to email your business over the last week.
Posts
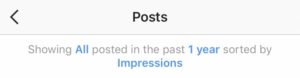
Right below the five statistics, you have “Posts“. When taping “see more”, the default setting will be “showing all posts in the past 1 year sorted by impressions”. Here, you have the ability to filter your posts based on a variety of different criteria to see which posts generated the best results.
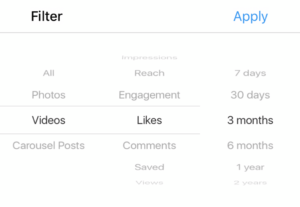
Filter
In the first section, you have the type of content you are going to filter.
You can filter your content based on:
- All
- Photos
- Videos
- Carousel Posts
In the middle section, you have the statistics that matter. Here, you can filter based on the following criteria:
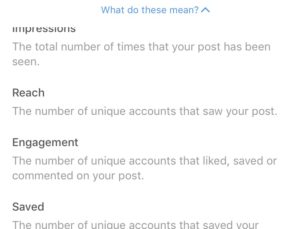
Impressions
The total number of times all of your posts have been seen.
Reach
The number of unique accounts that have seen any of your posts.
Engagement
The number of unique accounts that liked, saved or commented on your post.
Likes
The number of accounts that liked your post.
Comments
The number of accounts that commented your post.
Saved
The number of people who have saved your post.
Views
The number of times people have viewed your post.
Timespan
You can filter your posts based on time span. Choose between 7 days, 30 days, 3 months, 6 months, 1 year, or 2 years.
Stories
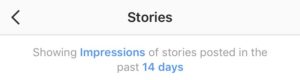
Below you posts, you can see analytics of Stories you have posted. If you’ve never posted any Stories, there won’t be any posts there.
However, if you have posted stories, you will be able to filter them in a similar way as your posts.
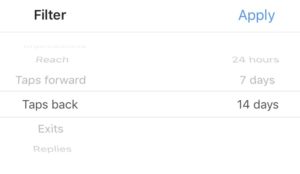
The default setting will be the following:
Follower Information
Below Stories, you have follower information. Here, you’ll get information about your followers, such as location, age, gender etc.
In the top of this section, you’ll see your exact follower amount. However, if you have under 10K followers, this won’t be necessary as you will be able to see your exact follower number in your profile. Right below your follower amount, you will see how the number has changed compared to last week.
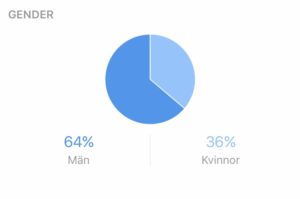
First of all, you’ll be presented with stats on how many percents of your followers are male as opposed to women.
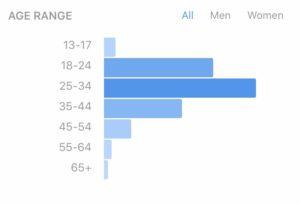
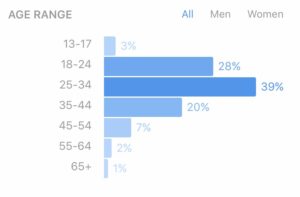
You’ll also see the age span of your followers. By tapping “all”, “men” or “women”, you’ll be able to see how the age differs between the genders.
Tap once on the graph and you’ll be able to view the different ages in percentages:
You are also able to see the top demographics of your followers.
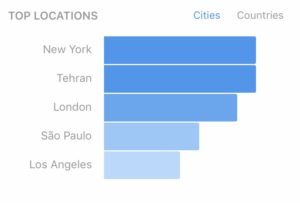
Tap once to see the percentages of the locations:
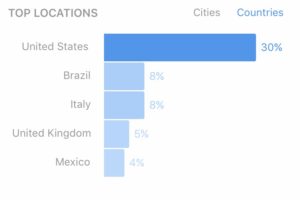
In the top-right corner, you also have the possibility of switching between countries and cities.
In the bottom of the Insights page, you have the last stat. As many tend to think, it is not the time of the day/weekday you receive the most followers.
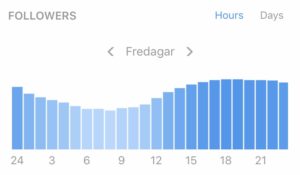
It is actually a stat that shows the times when your followers are most active on the platform. This statistic is based on the number of times they open the app on one day.
Tap on the arrows to the left and right to scroll between the weekdays to see which day of the week your followers are most active on the platform. This can be a good indication on when you should make a post to get the highest engagement.
You can also tap in the top right corner to change between hours and days.
Post stats
As mentioned, you can also access stats on individual posts in your feed.
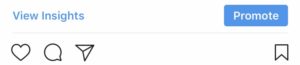
Simply go to the post you wish to see the stats of and tap “View insights” in the bottom left corner of it.
Here, you’ll get access to rich information about the post.
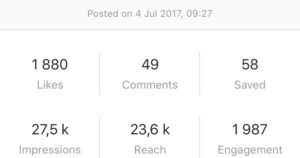
In the top, you can see what date you made the post, and even on what exact minute.
Just below that, we have all the different stats:
- Likes
- Comments
- Saved
- Impressions
- Reach
- Engagement
In the bottom of the page, you can tap “What do these mean?” To get an explanation of all the words.